WHAT IS PRODUCT PHOTOGRAPHY ?
Product photography, also known as e-commerce photography, is exactly what it seems like: images that are taken and utilized on social media and websites to help boost the revenue of your service or product. Given the development of online shopping, the variety of items and brands accessible to customers in any specific category may be large – which means that photographs that demonstrate what you’re offering and why it’s worth purchasing are a critical component for any business that sells online.
HOW DOES IT AFFECT THE ECOMMERCE BUSINESS?
93% of buyers believe that visual content is the most important deciding element in a buying choice. Most importantly, the pictures you’ll utilize to demonstrate how your items appear are ESSENTIAL.
According to Big Commerce research, 78% of online buyers want images to bring items to life – people want to view the object as if it were part of their personal lives. Product photography does have the ability to tell a tale: what the brand stands for, what it means to customers, and why a visitor should care.
Larger photos have an impact on both category and product pages. Because the photographs on category sites are often small, raising their size helps buyers to view the subtleties of each category, making the buying experience more delightful. Mall.cz, the Czech Republic’s second-largest e-commerce shop, saw a 9.46% boost in sales on product pages featuring larger photos.
Essential equipment for product photography
First and foremost. To create high-quality photos, you must have the proper tools on hand. You don’t have to get out your expensive DSLR camera to begin. A few pieces of basic equipment will suffice:
- A smartphone – Smartphones in recent generations offer outstanding photographic skills. Not only do they have the power to take high-quality, detailed shots, but modern phones offer a plethora of options to assist you enhance your images. Spend some time learning about your phone’s options, especially manual settings, to enhance quality. Alternatively, you might invest in a low-cost camera and lenses to capture your products in all their splendour.
- A tripod – A tripod guarantees that your camera is perfectly level, and it could be adjusted to a certain height and angle to ensure that all of your photographs are consistent. If you want to buy a good tripod for the smartphone, you should expect to pay between $20 and $60. Once your camera is mounted on a tripod, you may use a remote or a countdown timer to take images without accidentally moving anything.
- A light source – Another important aspect of great product photography is lighting. Although natural light helps in certain situations, it might shift throughout a session, making it unsuitable for producing pure product photographs that demand consistency and precision. While you may invest in highly qualified lighting and flashes, normal bulbs will suffice for now. If the shadows and glare are too strong, add a diffuser such as paper, white flat sheet, or white rubbish bags to soften the light. Just make sure that every DIY light reflectors are not flammable. Another excellent alternative for creating soft lighting is to purchase or make your own reflector.
- A sweep – A sweep is a solid, clean backdrop that eliminates the visual distractions from the background. It removes the line between the wall and the table and keeps you from catching any imperfections in the backdrop that you didn’t see with your naked eye. A huge piece of posterboard, roll of paper, or a sheet of cloth can be used to make a sweep. The top of your sweep can be attached to the purpose-built frame, the back of a chair, the wall, or even the back of a lightbox.
- A light box – Depending on the dimensions of your items, you may want to arrange them in a lightbox to guarantee that they are appropriately positioned between light sources. Built-in screens in light boxes filter light and decrease shadows. There are several internet methods for making low-cost table light boxes, or one may purchase one from a photographic supply store.
- Mannequins, stands, or racks – Each of them serves as static, standard props for displaying objects. As needed, try using dabs of glue or two-sided tape to hold things in place.
- Photo editing software – Adobe Photoshop and Adobe Lightroom, for example, may help you sharpen your photographs even further. They provide you with access to a variety of filters, effects, and graphical capabilities. However, you may not require the entire range of editing tools for your business. Before overpaying, consider other solutions, such as Wix’s built-in picture editor, which is offered to all Wix retailers.
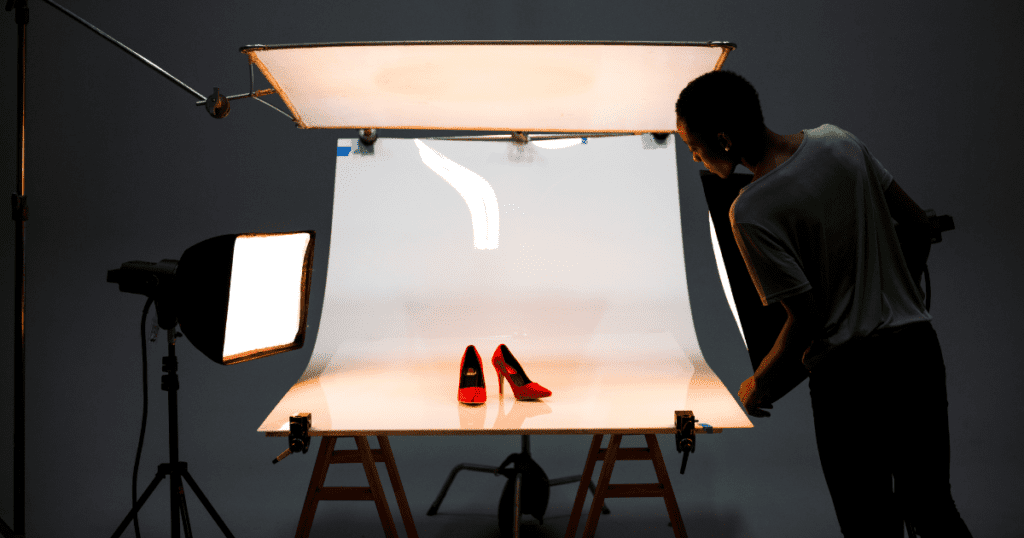
TIPS AND PROCESS OF TAKING GOOD COMMERCIAL PHOTOS –
1. Set up your background
Choosing the correct background not only puts the attention on the thing you’re photographing but also aids in the editing process during post-production. Using a bright or white backdrop will make removing undesirable elements and retouching images easier.
2. Set up your product
It’s now time to put your goods in the limelight.
It may appear straightforward, but getting the perspective, lighting, and location just perfect might take a few tries.
Place your object ahead of the background, centered and on a level, solid surfaces such as a desk or chair.
3. Adjust your lighting
Perfect lighting is among the most crucial aspects of creating a professional product shot. Although it may be time-consuming to modify, proper lighting can make or break an image, and you’ll undoubtedly thank yourself later in the post-production phase when you have fewer tweaks to make.
4. Use a tripod
To create that crisp-looking shot that captures every aspect of your goods, you’ll need a high depth of focus, which ultimately affects the image’s sharpness. To do this, adjust your camera to a low aperture and slow shutter speed.
5. Pick the right camera
This may seem obvious, but selecting the appropriate camera is critical to good product photography.
Of course, if you’re not intending on performing photoshoots on a regular basis, or if you’re on a limited budget, don’t feel obligated to invest in a high-end DSLR camera.
6. Take multiple pictures and evaluate
It’s now time to put your product pictures to use!
When you’re ready to begin snapping, keep in mind that the initial few may be a bit rusty, so take many. Take photographs from various angles, distances, and locations to see which works best.
7. Retouch your pictures
It’s now time for post-production. Even if you’ve previously snapped a few photographs that you like, retouching them is still an essential stage of the process. This will transform your photographs from mediocre to professional, and it will guarantee that all images of the products on your site have uniform quality, lighting, and location.
8. Optimize images
Unfortunately, the bigger the image on the website, the longer it takes for the page to load. However, increasing your SEO might degrade the quality of the image.
TOOLS NEEDED FOR PRODUCT PHOTOGRAPHY-
- Shooting table
- Studio lighting
- Light tent
- Tripod
- Photo Editing software
- Mobile grip


